I don't know about you but we go through chocolate syrup like CRAZY! With all the chocolate milk, ice cream topping, hot chocolate and random walk by the fridge and fill your mouth with creamy goodness, we need to buy it by the gallon.
So in order to save a little moolah I started looking around for an easy homemade recipe that would serve as a good stand in for the brown bottle of deliciousness.
Here is what I came up with. This is a combination of a few recipes I found online. They all have the same general principal but some of the measurements are a little different. Many people are certain that if you don't use Hershey's cocoa powder your right eye will fall out. Of course I had the cheapo generic cocoa powder in my pantry so that is what I used. I can tell you, the stuff is still fantabulous!
Before you start this make sure you have a nice fresh gallon of milk available because you must make a large class of chocolate milk to taste test.
Cast of characters...
1 cup packed cocoa powder
2 cups water
4 cups sugar
1/4 teaspoon salt
1/2 - 2/3 teaspoon vanilla
48oz empty chocolate syrup bottle
In a large pot, I use a 4 quart pot so I don't have to deal with boil over mess. The first attempt at this left my entire house smelling like burned chocolate and a big mess to clean up! Grab whatever you use to boil spaghetti in and you should be set.
Whisk the water and cocoa powder together over low heat. Add the sugar and whisk to dissolve.
Increase the heat until you have a light boil and continue stirring. Reduce heat to keep boil but you don't want to let it run away with you.
Boil and stir for 3-5 minutes. Remove from heat as necessary to keep it from boiling over. If you use a large pot this shouldn't be a problem.
After boiling for 3-5 minutes remove from heat and add salt and vanilla. Mix it well and set it aside to cool.
When cool, skim the skin off of the top, and pour into your empty chocolate syrup container. Store in the fridge.
Make sure the kids are doing something else and make yourself a large glass of heavenly chocolate milk!
You can play with this to make it just right for you. Maybe a little more vanilla? Half dark cocoa powder? Even add some peppermint extract around the holidays. There are so many things you could do with this and it is yummy and cheap.
Enjoy!!!
Tuesday, June 14, 2011
Thursday, June 2, 2011
Tortine di Lasagna
Now that we are all settled into our new house in San Antonio I am enjoying cooking new things in our absolutely beautiful kitchen.
One of our new favorites are Tortine di Lasagna, or Lasagna Muffins.
These are a fun and easy way to make individual servings of lasagna, plus the kids can help!
Here is what you need...
1 lb ground beef
1 lb sausage
1 cup spaghetti sauce
1 cup cottage cheese
1/4 teaspoon salt
1/4 teaspoon pepper
Phyllo dough (thawed)
1 1/2 cups shredded cheese
Go ahead and start your oven preheating to 375. These will only take a few minutes to throw together.
Brown the ground beef and sausage on the stove top, drain and scoop out 1/4 of the cooked meat. One of the lovely parts about this is the extra meat can be used to make spaghetti in a couple of days and half the work is done!
Once the meat is separated add the spaghetti sauce to the remaining meat mixture and stir.
In a separate bowl add the salt and pepper to the cottage cheese.
Cut your phyllo dough into shapes resembling rectangles. I just cut a 3" strip off the sheet and cut it ins half to create two rectangles about 3" by 4".
Layer 3 phyllo rectangles in each cup of a muffin tin.

 Now start filling in with half the cottage cheese mixture.
Then top with half of the meat mixture. Sprinkle with shredded cheese and cover with another two phyllo rectangles. Repeat the layers of cottage cheese and meat mixtures and top with the remaining shredded cheese.
Bake at 375 for 10-15 minutes until the cheese is melted and the phyllo is golden and crispy.
Allow them to cool for about 5 minutes before you scoop them out and serve.

I just serve these with some steamed broccoli and everyone is happy!
I think I may try a taco version of these with salsa, re fried beans and some green chilies. Should be yummy!!!
Enjoy!!
One of our new favorites are Tortine di Lasagna, or Lasagna Muffins.
These are a fun and easy way to make individual servings of lasagna, plus the kids can help!
Here is what you need...
1 lb ground beef
1 lb sausage
1 cup spaghetti sauce
1 cup cottage cheese
1/4 teaspoon salt
1/4 teaspoon pepper
Phyllo dough (thawed)
1 1/2 cups shredded cheese
Go ahead and start your oven preheating to 375. These will only take a few minutes to throw together.
Brown the ground beef and sausage on the stove top, drain and scoop out 1/4 of the cooked meat. One of the lovely parts about this is the extra meat can be used to make spaghetti in a couple of days and half the work is done!
Once the meat is separated add the spaghetti sauce to the remaining meat mixture and stir.
In a separate bowl add the salt and pepper to the cottage cheese.
Cut your phyllo dough into shapes resembling rectangles. I just cut a 3" strip off the sheet and cut it ins half to create two rectangles about 3" by 4".
Layer 3 phyllo rectangles in each cup of a muffin tin.

 Now start filling in with half the cottage cheese mixture.
 Then top with half of the meat mixture. Sprinkle with shredded cheese and cover with another two phyllo rectangles. Repeat the layers of cottage cheese and meat mixtures and top with the remaining shredded cheese.
Bake at 375 for 10-15 minutes until the cheese is melted and the phyllo is golden and crispy.
Allow them to cool for about 5 minutes before you scoop them out and serve.

I just serve these with some steamed broccoli and everyone is happy!
I think I may try a taco version of these with salsa, re fried beans and some green chilies. Should be yummy!!!
Enjoy!!
Tuesday, February 15, 2011
Fruity Thumbprints
There is a certain cookie manufacturer that makes these heavenly fruit filled cookies that I love. I have been known to eat the whole bag at once. Unfortunately for me these are a little pricey and I feel loads of guilt when I buy them and don't share.
So Dude and I found a recipe for home made thumbprint cookies.
This is super simple and yields fabulous cookies that can be customized to your specific tastes with the kind of jam you use. Next time I might go for fig preserves. Yummy!!

Take your room temperature butter and cream it together with the brown sugar. When it is nice and creamy add the vanilla and mix well.
In a separate bowl mix together the flour and salt, then add the dry ingredients to the butter mixture.
If you forget 1/2 of the butter you can add it now and the cookies will still be fabulous. Don't ask me how I know, I just know.
 Take about 2 tablespoons of dough and set on cookie sheet. Them press a thumbprint in middle. Smoosh the sides together whenever they crack to make a solid well for your jam. Then fill the well with your fruity goodness.
Put them in the oven at 325 for about 20 minutes. Then remove to a cooling rack. The jam will be boiling so be sure to keep little fingers away until they are well cooled.
Before you make these be sure to tell your friends and promise them some. We ended up with 24 cookies and enjoyed every one!

Fruity Thumbprints
1 cup salted butter, softened
2/3 cups brown sugar
1 teaspoon vanilla
1/2 teaspoon salt
2 cups flour
Jam or jelly (3/4 cups)
Cream butter and brown sugar until creamy and add vanilla.
In a separate bowl combine salt and flour.
Add the dry ingredients to the butter mixture and mix well.
scoop out two tablespoonfuls of dough onto cookie sheets.
Gently make well in the middle of each dough ball and press together side to hold the jam.
Fill the well with jam or jelly.
Bake at 325 for 20 minutes and set on a cooling rack to cool.
Enjoy!
So Dude and I found a recipe for home made thumbprint cookies.
This is super simple and yields fabulous cookies that can be customized to your specific tastes with the kind of jam you use. Next time I might go for fig preserves. Yummy!!
Cast of Characters

Take your room temperature butter and cream it together with the brown sugar. When it is nice and creamy add the vanilla and mix well.
In a separate bowl mix together the flour and salt, then add the dry ingredients to the butter mixture.
If you forget 1/2 of the butter you can add it now and the cookies will still be fabulous. Don't ask me how I know, I just know.

Put them in the oven at 325 for about 20 minutes. Then remove to a cooling rack. The jam will be boiling so be sure to keep little fingers away until they are well cooled.
Before you make these be sure to tell your friends and promise them some. We ended up with 24 cookies and enjoyed every one!

Fruity Thumbprints
1 cup salted butter, softened
2/3 cups brown sugar
1 teaspoon vanilla
1/2 teaspoon salt
2 cups flour
Jam or jelly (3/4 cups)
Cream butter and brown sugar until creamy and add vanilla.
In a separate bowl combine salt and flour.
Add the dry ingredients to the butter mixture and mix well.
scoop out two tablespoonfuls of dough onto cookie sheets.
Gently make well in the middle of each dough ball and press together side to hold the jam.
Fill the well with jam or jelly.
Bake at 325 for 20 minutes and set on a cooling rack to cool.
Enjoy!
Friday, February 11, 2011
Walt Disney World Dining
Let me just get this out of the way. I am the LUCKIEST kid in the world and my hubby and kiddos benefit from that luck as well.
Every other year Mimi and Poppop take the whole clan, there are 11 of us now, to Walt Disney World for a week or so. This is their big gift to their kids, and grandkids. Something that we would never be able to afford on our own, and an amazing opportunity to spend time with our extended family having a fabulous time.
I won't deny it, I may have more fun on these trips than my kids do, but it is the happiest place on earth, who wouldn't have a blast?
The key to a successful WDW vacation is planning. Not the type of commando planning that takes you through every hour of every day, but enough planning to give your vacation structure. An easy way to to this is through dining reservations. You can make these 180 days in advance and for some of the more popular you really need to get as close to that 180 day mark as possible. Especially if you are trying to make reservations for 11 people.
Since I am obsessed, I am going to tell you a little bit about where we will be eating this year. I have a little over a month to wait and it is KILLING me. With the house on the market I can't take over the guest room with packing preperation so I have to get my planning fix somewhere!
BBDub and I love eating "around the world" at EPCOT's World Showcase. Each of the country pavilions have lovely authentic table service and counter service restaurants. Over the years we have tried many and definitely have our favorites.
England boasts The Rose and Crown. They serve traditional pub style food in a lovely setting on the water. BBDub's favorite part is the Guinness on tap. He doesn't get a Guinness very often, maybe twice a year, and he has said watching fireworks with a Guinness is about as perfect as it gets.
Germany has Biergarten, a traditional German Oompah band and all the sausage and meat a carnavore could hope for. At least that is what I have been told. I can't believe we have never been here, but we are all excited to try it out this trip.
France brings us Chefs de France. A lovely, crisp, french dining experience. I always make the kids try escargot, because new experiences are good for them and then I get to finish what they won't. Oooh, the buttery, garlicy goodness. I can't wait!! The food here is always great, buttery and rich. The men may grumble when we are headed out to eat, but they always finish their meals!!!
Just outside of Chefs de France there is a fabulous little drink stand. They sell wine by the glass and the most wonderful adult ices ever!! My favorite is the Orange with Grand Marnier and Mimi enjoys the Lemon lime with Grey Goose. These are the perfect "snack" to refresh a tired, stroller pushing mama on a hot day. I have a completely separate budget for these. No mickey mouse t-shirt bought on a whim is going to keep me from refreshment!
Resort dining is also wonderful. At the end of the day, settling into a lovely restaurant away from the parks is often the perfect solution to aching feet and tired kids. Years ago Mimi and Poppop discovered Old Key West, a Disney Vacation Club Resort and we haven't stayed anywhere else. The resort is set back from the hustle and bustle of the parks with a lovely laid back, family friendly atmosphere. The "kids" enjoy the grounds and the pool, while the adults revel in the over-sized rooms with kitchens, balconies, private entrances and washers and dryers in the room!!! For the laundry obsessed these make the trip!
But I digress.
Old Key West also has Olivia's, a southern comfort food filled with heavenly grits in the morning and key lime tarts in the evening. Everything in between is wonderful. My only complaint is the they removed the Razzle Dazzle form the menu a couple years ago and neither Mimi or I can remember how it was made. That still doesn't keep us from relaxing in the family friendly atmosphere to exchange stories of our days and enjoy the fabulous food.
The Polynesian, a fancy-schmancy monorail resort, offers O'Hana. We have never been but we all enjoy hitting the counter service offerings there for lunch. My brilliant sister-in-law suggested we all try this one out since the kids would enjoy the luau and the menfolk could once again get all the meat their little hearts desired.
I am really excited to try this one out and I think the kids will get a kick out of the coconut races.
Beach Club, offers Cape May Clam Bake. Who can go wrong with an all you can eat schmorgus board of seafood. Crab legs, scallops, oysters, steamed mussels and the best clam chowder!!! I can't wait. I may need to bring a bib to save me from the melted butter mess, but it will be worth it!! Plus this restaurant is an easy walk from the back entrance to EPCOT, making firework viewing after dinner a piece of cake!!
Last but not least it Downtown Disney. A collection of restaurants and shops, an easy boatride from Old Key West. Here we enjoy Raglan Road. An Irish pub with bangers and mash, more Guinness, and live entertainment!!! I love the food and can't wait to pertake in the entertainment this year.
There you have it, all of our table service dining plans for our next trip. I have to admit, I love the food, but the opportunity to experience other cultures in a way only Disney can provide it part of the magic. Plus, having the chance gather as a family at the end of the day, often spent having seperate adventures, is what makes these trips so wonderful.
As we get closer I will be forced to go over other things that I am excited to do in WDW!
Thank you Mimi and Poppop for these wonderful gifts!!!
Monday, February 7, 2011
Orange Mango Smoothie
Smoothies are a big deal in our house. I could live on smoothies, a love that I am sure started in my pre-teen years cruising the mall while drinking an Orange Julius. Man, I used to love those things!!!
In order to fulfill my creamy-fruity need I am always looking for things to throw together in a creamy, dreamy, fruity concoction.
My latest love was born in the juice isle. I was looking for plain old boring O.J. when I spotted O.J. with Mango!!! Oh my, I had to have it. This lovely concoction did not disappoint, it is fabulous!
Once I had this fabulous juice I knew a smoothie was not far behind. I give you, the Orange Mango Smoothie.

I normally use the large tubs of yogurt, but I bought a ton of the individual servings for the kids after a week long yogurt obsession and now they won't touch them. Typical. So I need to use them up.
Frozen bananas are a staple in our freezer, as soon as they start to go brown in they go. We add them to all of our smoothies and never accumulate too many.
 In order to give this smoothie a real pop of mango flavor I picked up a can of mango pieces. Oooh, these are yummy! I threw in a couple pieces of mango and a little more than a cup of the orange juice.
If you like the slight crunch of ice then add a few pieces.
Blend, blend, blend and blend some more. If you are not going to share this with the kids throw in some rum for a lovely adult beverage.
Enjoy!

In order to fulfill my creamy-fruity need I am always looking for things to throw together in a creamy, dreamy, fruity concoction.
My latest love was born in the juice isle. I was looking for plain old boring O.J. when I spotted O.J. with Mango!!! Oh my, I had to have it. This lovely concoction did not disappoint, it is fabulous!
Once I had this fabulous juice I knew a smoothie was not far behind. I give you, the Orange Mango Smoothie.
Cast of Characters

I normally use the large tubs of yogurt, but I bought a ton of the individual servings for the kids after a week long yogurt obsession and now they won't touch them. Typical. So I need to use them up.
Frozen bananas are a staple in our freezer, as soon as they start to go brown in they go. We add them to all of our smoothies and never accumulate too many.

If you like the slight crunch of ice then add a few pieces.
Blend, blend, blend and blend some more. If you are not going to share this with the kids throw in some rum for a lovely adult beverage.
Enjoy!

Wednesday, February 2, 2011
Chicken Pot Pie
While the temps outside are below freezing, I am feeling snug and warm in our cozy house.
Our most recent storm brought a teensy bit of snow and two days of temperatures below zero. The schools were closed because of the cold weather and the kids were bouncing off of the walls!
Of course this drove me to distraction and domesticity. The kids have made forts of all kinds, played dominoes and uno, and watched all the movies I had the foresight to pick up at Red Box before the storm hit. They consumed a dozen popsicles and several gallons of hot chocolate.
Overall we had a great couple days together, and topped it off by making Chicken Pot Pie.
This recipe is very easy, although it takes a little longer to make than a typical weeknight meal, there are plenty of leftovers for lunch or dinner the next day.

I know there are ways to make this completely from scratch, but that just isn't how I roll. I am more of the throw together girl and the idea of making a pie crust from scratch makes me a little scared.
So I reach for the pre-made ingredients. AKA: Give thinks for pre-made to keep mommy sane!
If you cook your own chicken breast, just cut it into bite sized pieces. About two cups worth. I like getting the pre-cooked chicken on occasion, just to make my life a little simpler. If you get the frozen pre-cooked stuff, be sure to let it thaw at least half way.
Pick whatever frozen veggies your family likes. Dude and Birdie have very strong opinions about what veggies should be allowed in their pot pie, so we stick to the peas and carrots. I have found at 12-14oz of veggies makes a nice chicken to veggie ratio.
Mix your chicken, veggies, cream of mushroom, 1/2 cup cheese, salt and pepper together. You can use whatever cheese you like. I had part of a brick of velveeta in the fridge so I just cubed it and mixed it in. Salt and pepper amounts are up to you. I just sprinkle the pepper in until everything has a little. Salt is a big option here too. I do a couple grinds of seal salt, just to bring out the flavor, but the condensed soup adds plenty of salt.
Unroll one of your pie crusts and slap it in your pie plate, fill the crust with your chicken mixture and top with the second pie crust. There will be too much dough on this one. You can cut it off or just fold it down and pinch it together like I do. Really, who would want to waste good crust.
 Cut some slits in the top to let the steam escape and pop this baby in the oven at 425. Let it bake for 35-40 minutes, until the crust is golden. Take it out and let it rest. Seriously, you need to let the fabulousness that is inside thicken up a little. I try to let it sit for about 20 minutes, if we can keep our fingers out.
Serve and enjoy. Then enjoy again tomorrow.

Chicken Pot Pie
2 refrigerated pie crusts
2 cups chicken cubed
12-14 oz frozen vegetables
1 can Cream of mushroom
1/2 cup cheese, grated or processed
Salt and pepper to taste
Mix the cubed chicken, veggies, condensed soup, salt and pepper.
Place one pie crust in a pie plate. Fill with chicken mixture, and top with second pie crust.
Crimp edges together and cut sluts in top for steam to escape.
Bake at 425 for 35-40 minutes, and allow to rest out of the oven for another 20.
Enjoy!
Our most recent storm brought a teensy bit of snow and two days of temperatures below zero. The schools were closed because of the cold weather and the kids were bouncing off of the walls!
Of course this drove me to distraction and domesticity. The kids have made forts of all kinds, played dominoes and uno, and watched all the movies I had the foresight to pick up at Red Box before the storm hit. They consumed a dozen popsicles and several gallons of hot chocolate.
Overall we had a great couple days together, and topped it off by making Chicken Pot Pie.
This recipe is very easy, although it takes a little longer to make than a typical weeknight meal, there are plenty of leftovers for lunch or dinner the next day.
Cast of Characters

I know there are ways to make this completely from scratch, but that just isn't how I roll. I am more of the throw together girl and the idea of making a pie crust from scratch makes me a little scared.
So I reach for the pre-made ingredients. AKA: Give thinks for pre-made to keep mommy sane!
If you cook your own chicken breast, just cut it into bite sized pieces. About two cups worth. I like getting the pre-cooked chicken on occasion, just to make my life a little simpler. If you get the frozen pre-cooked stuff, be sure to let it thaw at least half way.
Pick whatever frozen veggies your family likes. Dude and Birdie have very strong opinions about what veggies should be allowed in their pot pie, so we stick to the peas and carrots. I have found at 12-14oz of veggies makes a nice chicken to veggie ratio.
Mix your chicken, veggies, cream of mushroom, 1/2 cup cheese, salt and pepper together. You can use whatever cheese you like. I had part of a brick of velveeta in the fridge so I just cubed it and mixed it in. Salt and pepper amounts are up to you. I just sprinkle the pepper in until everything has a little. Salt is a big option here too. I do a couple grinds of seal salt, just to bring out the flavor, but the condensed soup adds plenty of salt.
Unroll one of your pie crusts and slap it in your pie plate, fill the crust with your chicken mixture and top with the second pie crust. There will be too much dough on this one. You can cut it off or just fold it down and pinch it together like I do. Really, who would want to waste good crust.

Serve and enjoy. Then enjoy again tomorrow.

Chicken Pot Pie
2 refrigerated pie crusts
2 cups chicken cubed
12-14 oz frozen vegetables
1 can Cream of mushroom
1/2 cup cheese, grated or processed
Salt and pepper to taste
Mix the cubed chicken, veggies, condensed soup, salt and pepper.
Place one pie crust in a pie plate. Fill with chicken mixture, and top with second pie crust.
Crimp edges together and cut sluts in top for steam to escape.
Bake at 425 for 35-40 minutes, and allow to rest out of the oven for another 20.
Enjoy!
Wednesday, January 26, 2011
Creamy Tomato Soup
We woke up this morning to a dusting of snow on the ground and I just wanted to snuggle back into bed and go back to sleep. Unfortunately for me it is Wednesday and Birdie is in the midst of spirit week at school. So I hualed myself out of bed and helped her create a superhero costume out of her closet. I am not sure what kind of superhero she was but she was thrilled. Once we dropped her off at school I turned to Dude and said, I know what we are going to do today!!!
Make Tomato Soup!!!
Growing up I loved Cambells Tomato Soup. With grilled cheese or saltine crackers, it was divine!
However, as I have gotten older it doesn't really cut it for me anymore. I had resigned myself to only enjoying tomato soup at restaurants and living with the disappointment.
Everything changed when I read a post on Eat, Live, Run where she makes a super easy and yummy creamy tomato soup. So I swooped right in and stole her recipe!!!
I love easy, and I love quick and I adore minimal cleanup! This is a keeper in our house.

Dice up 1/2 an onion and about 6 roma tomatoes. You can use a 16 oz can of good diced tomatoes here too, but I actually had fresh so that is what I went with!
Toss the onion in your soup pot with 3 tablespoons of butter and cook them until they are good and caramelized, just a little brown. Throw in 3 tablespoons of flour and mix together to create a roux.
 While the roux is cooking for a few minutes toss the diced tomatoes, baking soda, salt and sugar together in a bowl.
Then add the cream to the roux, stir well and toss in the tomato mixture. Let this cook for 4-5 minutes while you get out your handy dandy immersion blender.
 Put that puppy in and go to town!!! If you don't have an immersion blender you can transfer this to a blender and use that to puree.
Now EAT! You can serve this with a heavenly gooey grilled cheese, toasted bread, saltines or a healthy side salad. Whatever your little heart desires. Just make sure to eat quickly so you can get seconds before your kids gobble it all up!!

Creamy Tomato Soup
3 tablespoons Butter
1/2 yellow Onion diced
3 tablespoons Flour
1/4 teaspoon Baking Soda
3/4 teasppon Salt
1 teaspoon sugar
2-3 cups Tomatoes diced
1 pint Cream
1/2 cup Milk
Heat butter in your soup pot and add onions. Saute until just brown. Add flour and mix well.
Allow roux to cook while you mix tomatoes with baking soda, salt and sugar.
Add cream and milk to the roux and stir well. Add tomato mixture and allow to simmer for 4-5 minutes.
Puree with immersion blender or standard blender.
Serve warm with crusty bread, grilled cheese or a side salad.
Enjoy!!!
Make Tomato Soup!!!
Growing up I loved Cambells Tomato Soup. With grilled cheese or saltine crackers, it was divine!
However, as I have gotten older it doesn't really cut it for me anymore. I had resigned myself to only enjoying tomato soup at restaurants and living with the disappointment.
Everything changed when I read a post on Eat, Live, Run where she makes a super easy and yummy creamy tomato soup. So I swooped right in and stole her recipe!!!
I love easy, and I love quick and I adore minimal cleanup! This is a keeper in our house.
Cast of Characters

Dice up 1/2 an onion and about 6 roma tomatoes. You can use a 16 oz can of good diced tomatoes here too, but I actually had fresh so that is what I went with!
Toss the onion in your soup pot with 3 tablespoons of butter and cook them until they are good and caramelized, just a little brown. Throw in 3 tablespoons of flour and mix together to create a roux.

Then add the cream to the roux, stir well and toss in the tomato mixture. Let this cook for 4-5 minutes while you get out your handy dandy immersion blender.

Now EAT! You can serve this with a heavenly gooey grilled cheese, toasted bread, saltines or a healthy side salad. Whatever your little heart desires. Just make sure to eat quickly so you can get seconds before your kids gobble it all up!!

Creamy Tomato Soup
3 tablespoons Butter
1/2 yellow Onion diced
3 tablespoons Flour
1/4 teaspoon Baking Soda
3/4 teasppon Salt
1 teaspoon sugar
2-3 cups Tomatoes diced
1 pint Cream
1/2 cup Milk
Heat butter in your soup pot and add onions. Saute until just brown. Add flour and mix well.
Allow roux to cook while you mix tomatoes with baking soda, salt and sugar.
Add cream and milk to the roux and stir well. Add tomato mixture and allow to simmer for 4-5 minutes.
Puree with immersion blender or standard blender.
Serve warm with crusty bread, grilled cheese or a side salad.
Enjoy!!!
Wednesday, January 19, 2011
Eggs in a Nest (Toad in a Hole)
The kids and I spend the holiday weekend in La Veta with Mimi and PopPop.
We had a wonderful time, climbing trees, exploring a ski resort, movies, parachute games, bald eagles and just enjoying each other's company.


One of Birdie's favorite things to do in La Veta is cook Eggs in a Nest. Last Summer she spent several weeks with Mimi and PopPop and this is one of the many skills she came home with. So Monday morning shewas ready to set up her assembly line and feed everyone.
The requirements are very simple.
Eggs, bread, butter, salt and pepper. Done!

She likes to make these with two eggs, I think it is just because she likes to crack more eggs.
Then she cuts outthe center of the bread with a cookie cutter and waits for Mimi's skillet to be ready.
 In goes the bread and the eggs get dumped more or less in the hole. She needs a little assistance to flip them and remove to a plate, but she is ready with her salt and pepper at the end. Always asking if you would like a lot or a little.
What a yummy, filling and quick breakfast for any day. Plus the kids love to help! Maybe next time she will let Dude help.

 Even Piper enjoys this one...
We had a wonderful time, climbing trees, exploring a ski resort, movies, parachute games, bald eagles and just enjoying each other's company.


One of Birdie's favorite things to do in La Veta is cook Eggs in a Nest. Last Summer she spent several weeks with Mimi and PopPop and this is one of the many skills she came home with. So Monday morning shewas ready to set up her assembly line and feed everyone.
The requirements are very simple.
Eggs, bread, butter, salt and pepper. Done!

She likes to make these with two eggs, I think it is just because she likes to crack more eggs.
Then she cuts outthe center of the bread with a cookie cutter and waits for Mimi's skillet to be ready.


What a yummy, filling and quick breakfast for any day. Plus the kids love to help! Maybe next time she will let Dude help.


Monday, January 10, 2011
Quesadillas de Camarones from The Pioneer Woman
Ouch - it has been too long since I last posted. I have been struggling with a dern cold for the last 10 days. It really knocked me on my ear last week. I was barely able to function, much less think of posting topics. Things are looking better now, I think I almost have it kicked and I am back on the wagon!!!
 The last 24 hours have brought us about 10-12 inches of the powdery white stuff and school is closed for a SNOW DAY!!! When I was a kid we never had snow days, delays yes, but never the whole day off. What gives? I think the administration has gone soft. Although, these days are so much fun I can't really complain.
Dude spent the morning shoveling the snow off of the deck, he is obsessed with shoveling. I think he relishes the completeness that he can see so well when he has finished an area. While he was out in the cold, silly beast, Birdie and I hung out inside where it was warm and puttered. I just love to putter, doing nothing specific, just whatever whim flutters by. It is quite relaxing.
While perusing my favorite blogs I stumbled upon The Pioneer Woman's Quesadillas de Camarones that she featured a couple days ago. Thanks to the ingrained fear of being snowed in with two crazed beasts I hit the grocery store hard yesterday, along with every other mother in Castle Rock. With the spoils from the trip and some frozen shrimp I dug out of the deep freeze we will be trying these out today. I am not sure how the kids will feel about them, but I am super-duper excited.
So here goes, PW's Quesadillas de Camarones!

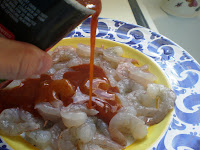 All I had were frozen shrimp so I set these out to thaw for a couple hours. Then I removed the shells and smothered them in the red sauce and set aside to marinate.
Go ahead and shred that cheese!! Make sure to take a couple samples to make sure it is good and cheesy.
Slice up those bell peppers and onion. I tried to keep the pieces an inch or smaller, that way they would be easier to consume without having one pull out of the steaming quesadilla and flop on your chin. Owweee!!
 Heat up a skillet, add a dollop of olive oil or butter and add the veggies. Cook them on med-high heat until they reach the perfect consistency for you. Mine were pretty limp and brown, but you can leave them crunchier if that is what your audience prefers.
Remove the veggies from the skillet and add the shrimp, sauce and all. Cook on medium-high until the shrimp are opaque. PW says to add a little water if they start to dry out, but I had plenty of sauce.

Once the shrimp are cooked, remove them and cut into bite sized pieces.
If you want you can grab a fresh skillet, or you can jut wipe out the one you were using and forge ahead. I can't help it, I am always trying to reduce the number of dirty dishes in this house!!

M - I - C
K - E - Y
M O U S E !!!!
(Sorry, I get distracted)
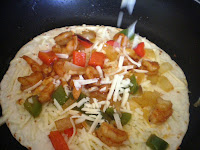
Melt a little butter and toss in a tortilla. Add some cheese, veggies and shrimp, a little more cheese and top with another tortilla. Add butter as the skillet dries out and repeat until you have enough to feed your herd.
You can serve these with salsa, sour cream, guacamole or just by themselves. Yummy!!!
I thought these were fabulous! The kids developed a sudden vegetable fear and needed lots of persuasion to try them, but pronounced them good. If you do the prep ahead of time these would be a great meal for Moms at a play-date or a girls night. So simple to throw together!

If you are avoiding carbs, just take the hot shrimp, add some veggies and a little cheese and yummo!!
I hope your snow day has been lovely!!!
PW's Quesadillas de Camarones
Flour Tortillas
24ish Shrimp
Red Sauce
16 oz Monterrey Jack cheese
Onion
Red Bell Pepper
Green Bell Pepper
Olive Oil
Butter
Thaw and peel the shrimp. Cover them in the red sauce and set aside to marinate.
Grate your cheese and set aside. Cut up the veggies (1" or smaller) and add a little olive oil to a skillet. When oil is hot add the veggies and saute on medium-high until desired consistency.
REmove from skillet and add shrimp and sauce. Cook on medium-high until opaque. If the sauce gets really dry, add a little water. Remove cooked shrimp from heat and cut into bite sized pieces. Wipe out skillet and add a littel butter. Heat butteer and add a tortilla, cheese, shrimp and veggies. Top with another tortilla. Repeat until complete. Add more butter when the skillet gets dry.
Serve with salsa, sour cream or guacamole and enjoy!!

Dude spent the morning shoveling the snow off of the deck, he is obsessed with shoveling. I think he relishes the completeness that he can see so well when he has finished an area. While he was out in the cold, silly beast, Birdie and I hung out inside where it was warm and puttered. I just love to putter, doing nothing specific, just whatever whim flutters by. It is quite relaxing.
While perusing my favorite blogs I stumbled upon The Pioneer Woman's Quesadillas de Camarones that she featured a couple days ago. Thanks to the ingrained fear of being snowed in with two crazed beasts I hit the grocery store hard yesterday, along with every other mother in Castle Rock. With the spoils from the trip and some frozen shrimp I dug out of the deep freeze we will be trying these out today. I am not sure how the kids will feel about them, but I am super-duper excited.
So here goes, PW's Quesadillas de Camarones!
Cast of characters


Go ahead and shred that cheese!! Make sure to take a couple samples to make sure it is good and cheesy.
Slice up those bell peppers and onion. I tried to keep the pieces an inch or smaller, that way they would be easier to consume without having one pull out of the steaming quesadilla and flop on your chin. Owweee!!

Remove the veggies from the skillet and add the shrimp, sauce and all. Cook on medium-high until the shrimp are opaque. PW says to add a little water if they start to dry out, but I had plenty of sauce.

Once the shrimp are cooked, remove them and cut into bite sized pieces.
If you want you can grab a fresh skillet, or you can jut wipe out the one you were using and forge ahead. I can't help it, I am always trying to reduce the number of dirty dishes in this house!!

M - I - C
K - E - Y
M O U S E !!!!
(Sorry, I get distracted)
Melt a little butter and toss in a tortilla. Add some cheese, veggies and shrimp, a little more cheese and top with another tortilla. Add butter as the skillet dries out and repeat until you have enough to feed your herd.

You can serve these with salsa, sour cream, guacamole or just by themselves. Yummy!!!
I thought these were fabulous! The kids developed a sudden vegetable fear and needed lots of persuasion to try them, but pronounced them good. If you do the prep ahead of time these would be a great meal for Moms at a play-date or a girls night. So simple to throw together!

If you are avoiding carbs, just take the hot shrimp, add some veggies and a little cheese and yummo!!
I hope your snow day has been lovely!!!
PW's Quesadillas de Camarones
Flour Tortillas
24ish Shrimp
Red Sauce
16 oz Monterrey Jack cheese
Onion
Red Bell Pepper
Green Bell Pepper
Olive Oil
Butter
Thaw and peel the shrimp. Cover them in the red sauce and set aside to marinate.
Grate your cheese and set aside. Cut up the veggies (1" or smaller) and add a little olive oil to a skillet. When oil is hot add the veggies and saute on medium-high until desired consistency.
REmove from skillet and add shrimp and sauce. Cook on medium-high until opaque. If the sauce gets really dry, add a little water. Remove cooked shrimp from heat and cut into bite sized pieces. Wipe out skillet and add a littel butter. Heat butteer and add a tortilla, cheese, shrimp and veggies. Top with another tortilla. Repeat until complete. Add more butter when the skillet gets dry.
Serve with salsa, sour cream or guacamole and enjoy!!
Tuesday, January 4, 2011
Things I Love - Yogurtland
Let me tell you about my frozen treat addiction. It is going to be the death of me. I cannot have ice cream in the house because it calls to me. Reaches out it's chilly, creamy, sweet fingers and makes me eat it!!
So I try to keep it out of the house and only indulge once a week, or so. Some people have a Starbucks habit, well I have a Yogurtland habit. Thankfully the closest store is about 30 minutes from my house and I have to come up with a secondary excuse to go there to rationalize my need.
Remember TCBY? Yogurtland is very similar, except for the fact that you get to choose from 16 fabulous self serve flavors. Then you get to top it from the toppings bar with anything from fruit to candy bars. The kicker? It is only 30 cents/ounce. Of course, that sounds cheap, but when you get the large bowl and utilize the tapping method to settle your yogurt, the cost is similar to one of the fancy we-mix-your-ice-cream-with-the-toppings-of-your-choice chains. Thankfully my kids aren't quite as heavy handed as I am and we can still get out of there for about $12 between the three of us. Dude always gets the chocolate, no need to explain, we all understand 5 year old boy humor. Birdie is in LOVE with the blood orange and is in despair that our store seems to have dropped that flavor in the last month in favor of mango. So she settles for the plain yogurt flavor. It is nice and tart, just like plain yogurt.
I have such a hard time making my decision!! I adore the coffee with a chocolate chips, peanuts and chocolate sauce. But sometimes I have to deviate from coffee and hit up the mango, strawberry or blood orange. They are all simply fabulous!!! The kids will tell you about the time I got two small cups because I couldn't decide. When they said it wasn't fair I calmly explained that I am the Mommy so I need more yogurt. Then karma took a bite out of me when we got to the car and the battery was dead. I don't think I will get away with two cups ever again.
So if you are near a Yogurtland, I am telling you to get off your duff and scurry on over. Even if there is a long line, it is worth it!!
I am devastated that the is not a Yogurtland in San Antonio. Anyone have $500k they want to use to help me start a franchise? I promise I won't eat there every day.
Monday, January 3, 2011
Peanut Soup
When I was a child we always had peanut soup before Christmas or Thanksgiving dinner. Just about the time the smell of the turkey sent us all into the kitchen to ask when dinner would be ready Mimi would hand us a steaming mug of peanut soup. Not enough to kill our holiday appetite, but just enough to satisfy the ravenous beast until the meal was ready. In hindsight, I don't remember much else about the food at our holiday meals, that peanut soup was hard to beat.
So I told BBDub that he is going to have a new adventure this year and I am going to re-establish the tradition of peanut soup.
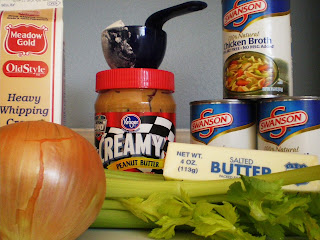
 Dice up the onion and celery. Saute them with the butter until soft. Don't let your kids distract you and burn the onions. However, if you just burn them a little bit the soup will turn out just fine.
Slowly incorporate the flour with your handy dandy flat whisk. If you don't have a flat whisk, get one! Run out to the after Christmas sales and treat yourself. Mine was $8 and one of the best kitchen purchases EVER!
Once the flour is incorporated to the butter, mix in the chicken broth, stirring constantly, bring to a boil.
And remove from heat.
 Now here you have two options.Let the soup cool and put it in your blender to create a lovely smooth base. Or if you have a immersion blender you can just blend it up on the stove top. My immersion blender is another handy kitchen tool. They can be quite expensive, but if you stalk one on Amazon you can score quite a deal. I got mine, with a whisk attachment and chopping bowl for $25. I have used it many times and think it was worth that price.
Once the broth mixture is blended and smooth add your peanut butter and cream, mix thoroughly. Return to heat (low) until hot, but do not boil.
Garnish with chopped nuts and serve.
The ravenous herds will thank you.
You can also serve cold, or cook ahead of time and reheat when you are ready to serve.
Peanut Soup
1 medium onion, chopped
2 ribs celery, chopped
1/4 cup butter
3 tbl flour
4 cans chicken stock
2 cups smooth peanut butter
2 cups cream
chopped peanuts
Saute onion and celery in butter until soft, not brown. Add flour and stir in well.
Slowly add chicken stock, stirring constantly and bring to a boil.
Remove from heat and either cool and blend in blender, or use immersion blender to create smooth base.
Return to heat (low) and add cream and peanut butter. Stir well and heat through.
Serve warm or cold, garnished with chopped nuts.
Enjoy!!
So I told BBDub that he is going to have a new adventure this year and I am going to re-establish the tradition of peanut soup.
Cast of Characters

 Dice up the onion and celery. Saute them with the butter until soft. Don't let your kids distract you and burn the onions. However, if you just burn them a little bit the soup will turn out just fine.
Slowly incorporate the flour with your handy dandy flat whisk. If you don't have a flat whisk, get one! Run out to the after Christmas sales and treat yourself. Mine was $8 and one of the best kitchen purchases EVER!
Once the flour is incorporated to the butter, mix in the chicken broth, stirring constantly, bring to a boil.
And remove from heat.
 Now here you have two options.Let the soup cool and put it in your blender to create a lovely smooth base. Or if you have a immersion blender you can just blend it up on the stove top. My immersion blender is another handy kitchen tool. They can be quite expensive, but if you stalk one on Amazon you can score quite a deal. I got mine, with a whisk attachment and chopping bowl for $25. I have used it many times and think it was worth that price.
Once the broth mixture is blended and smooth add your peanut butter and cream, mix thoroughly. Return to heat (low) until hot, but do not boil.
Garnish with chopped nuts and serve.

The ravenous herds will thank you.
You can also serve cold, or cook ahead of time and reheat when you are ready to serve.

Peanut Soup
1 medium onion, chopped
2 ribs celery, chopped
1/4 cup butter
3 tbl flour
4 cans chicken stock
2 cups smooth peanut butter
2 cups cream
chopped peanuts
Saute onion and celery in butter until soft, not brown. Add flour and stir in well.
Slowly add chicken stock, stirring constantly and bring to a boil.
Remove from heat and either cool and blend in blender, or use immersion blender to create smooth base.
Return to heat (low) and add cream and peanut butter. Stir well and heat through.
Serve warm or cold, garnished with chopped nuts.
Enjoy!!
Sunday, January 2, 2011
Tubing
The last couple of years we have taken the kids tubing in Fraser, Colorado. It is an easy day trip for us and we pack a picnic lunch to enjoy after the fun ends.
We try to head out of he house at about 8am in order to be some of the first to the tubing hill at 10. Try is the operative word here, this year we were closing the garage at 8:45. I blamed it on the fact that we went December 26th and we were all still recovering from a fun filled Christmas day!
 The nice thing is that all you need to bring is snow gear. The tubing hill provides the helmets, tubes and magic carpet.
After two hours on the road, this includes one potty stop along the way, we were there. The Colorado Adventure Park boasts 4 tubing hills from green to double black, a fire pit and the blessing called a magic carpet.

Once we get our two hour tubing passes and select our tubes we jump on the magic carpet to start the fun.
 Remember when you were a kid and the joy was sucked out of sledding because you had to haul yourself and the sled back up the hill? While our parents chortled to themselves about how tired we would be in an hour. Well my friends, do not fear about having to haul your kids, their tubes, your tube and yourself back up the fabulously steep hill. Some wonderful human being has come up with the answer. Magic Carpet Lifts do all of the work for you, while you take a break.
 The next two hours were spent in mind numbing bliss of tearing down the hills solo or in groups, in search of the elusive "air" and trying to avoid leaving our kids behind as we raced back up to the top.

After our time is up we gather at the fire pit for a picnic lunch before heading home with a car load of exhausted kids and parents. Although never too exhausted for a stop at Yogurtland!

If you are able to hit a tubing hill this winter - do it! You won't regret it and your kids will talk about how much fun they had for months!!
We try to head out of he house at about 8am in order to be some of the first to the tubing hill at 10. Try is the operative word here, this year we were closing the garage at 8:45. I blamed it on the fact that we went December 26th and we were all still recovering from a fun filled Christmas day!
 The nice thing is that all you need to bring is snow gear. The tubing hill provides the helmets, tubes and magic carpet.
After two hours on the road, this includes one potty stop along the way, we were there. The Colorado Adventure Park boasts 4 tubing hills from green to double black, a fire pit and the blessing called a magic carpet.

Once we get our two hour tubing passes and select our tubes we jump on the magic carpet to start the fun.
 Remember when you were a kid and the joy was sucked out of sledding because you had to haul yourself and the sled back up the hill? While our parents chortled to themselves about how tired we would be in an hour. Well my friends, do not fear about having to haul your kids, their tubes, your tube and yourself back up the fabulously steep hill. Some wonderful human being has come up with the answer. Magic Carpet Lifts do all of the work for you, while you take a break.
 The next two hours were spent in mind numbing bliss of tearing down the hills solo or in groups, in search of the elusive "air" and trying to avoid leaving our kids behind as we raced back up to the top.
After our time is up we gather at the fire pit for a picnic lunch before heading home with a car load of exhausted kids and parents. Although never too exhausted for a stop at Yogurtland!

If you are able to hit a tubing hill this winter - do it! You won't regret it and your kids will talk about how much fun they had for months!!
Saturday, January 1, 2011
Black Eyed Pea Dip
Happy New Year!
In our home we have a tradition of eating black eyed peas every January 1st for good luck. Unfortunately Birdie and Dude are not fans, so this tradition becomes a battle of wills. When I saw this recipe on The Pioneer Woman's blog I knew I had to try it.
 In my goal to dirty as few dishes as possible I did this all in the dish I used to bake it. Voila, very little clean up!
Now, mash up those black eyed peas! Not all of them, about 2/3 of the can, you want a few whole for a little texture.

Then chop up the jalapenos and onions. Mix in the sour cream, salsa and grated cheese. I try to grate my own cheese most of the time, it saves bundles of cash and then I can sample some.
I omitted the hot sauce since the kids are a little tender about spicy things, but I think it would be even better with it!
Bake at 350 for 20-30 minutes and let it rest for about 10 minutes before serving. Mine was 1-2 inches thick, if you go much thicker, I would increase the baking time by 10 minutes, just to be sure the center gets cooked well.

Serve with tortilla chips!
Black Eyed Pea Dip
1 can black eyed peas
1/2 onion diced - diced
1 small can jalapenos - diced
2/3 cup sour cream
1 cup grated cheddar
3 tbl salsa
hot sauce to taste
Drain peas and mash with a potato masher.
Stir in remaining ingredients and spread in baking dish.
Bake at 350 for 25-30 minutes.
Enjoy!
In our home we have a tradition of eating black eyed peas every January 1st for good luck. Unfortunately Birdie and Dude are not fans, so this tradition becomes a battle of wills. When I saw this recipe on The Pioneer Woman's blog I knew I had to try it.
Cast of Characters

Now, mash up those black eyed peas! Not all of them, about 2/3 of the can, you want a few whole for a little texture.

Then chop up the jalapenos and onions. Mix in the sour cream, salsa and grated cheese. I try to grate my own cheese most of the time, it saves bundles of cash and then I can sample some.
I omitted the hot sauce since the kids are a little tender about spicy things, but I think it would be even better with it!
Bake at 350 for 20-30 minutes and let it rest for about 10 minutes before serving. Mine was 1-2 inches thick, if you go much thicker, I would increase the baking time by 10 minutes, just to be sure the center gets cooked well.

Serve with tortilla chips!
Black Eyed Pea Dip
1 can black eyed peas
1/2 onion diced - diced
1 small can jalapenos - diced
2/3 cup sour cream
1 cup grated cheddar
3 tbl salsa
hot sauce to taste
Drain peas and mash with a potato masher.
Stir in remaining ingredients and spread in baking dish.
Bake at 350 for 25-30 minutes.
Enjoy!
Subscribe to:
Comments (Atom)